Acrylic is well documented for most CNC users. Graphite is a little different, but not much different than other fiberous synthetic material- and the graphite layer is really thin anyway which makes this more about cnc milling fiberglass and resin more than anything else. That embedded sheet of acrylic makes this different, though.
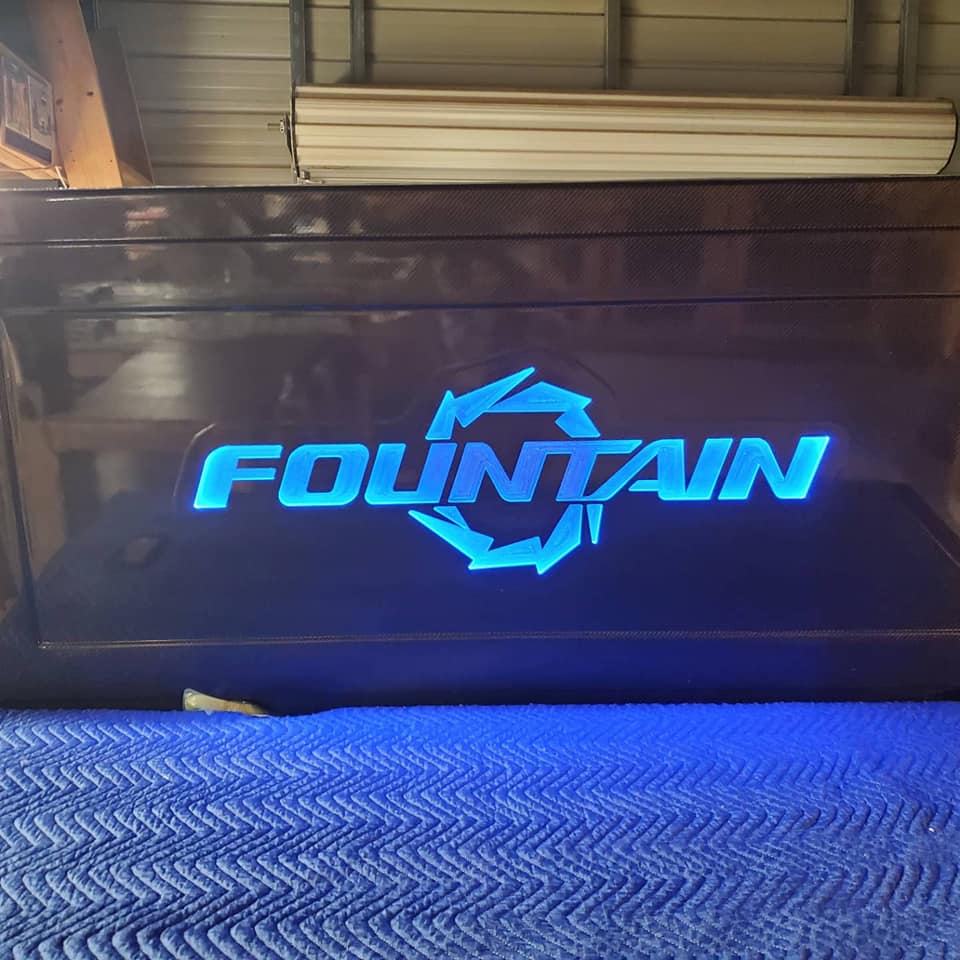
Fountain Power Boats, in addition to making wickedly fast and stylish boats, also have a penchant for cutting edge graphics. Lighted edge acrylic isn’t exactly cutting edge anymore- but- encapsulated in an engine hatch made of glass, gelcoat, and carbon fiber kinda is- and if for no other reason the temperatures in those engine compartments gets to around 180* above those fire breathing 3kHP engines.
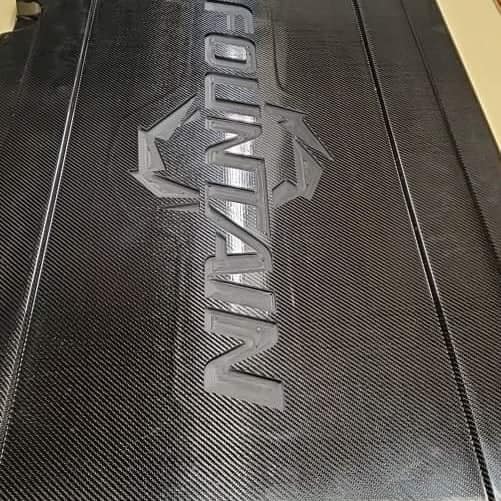
These engine hatches, the carved part, faces the engines when the hatches are closed and only reveal when they are open. The resin used has to be suitable for that environment, and that includes filling the logo pockets carved out by the CNC.
Let’s just shut up and get to it, huh?
This job is nerve wracking as those hatches aren’t easily recovered if the cnc operator screws up. They are incredibly expensive and I’m honored to be entrusted with such a job.
Aligning the hatches is the hardest part. Finding the acrylic sheet (3/8″ thick and borders 1″ outside the intended logo carving) is the trickiest part. Once it is found and the hatch is aligned perfectly on the table and well affixed, finding center of the acrylic is next. The easiest thing to do is find dead center of the acrylic and set the origin of the tool path at dead center as well.
Cutting is the easy part.
One tool; One Path. Amana 51411-K, which is a O Flute up cut spiral 1/4″ wide. The settings are intended to ramp into the cut over an inch span, and to allow the extremely sharp shank of that bit to do it’s magic to the surface… It does that by passing in 1/8″ depths (half the width of the bit) and at 150IPM with a spindle speed of 18k RPMs. If there is any advice I could offer it is to just trust the machine. It’ll make pretty chips at these settings and moving fast enough to prevent melting.
Well… there is one more piece of advice: “when working on a substrate so expensive and which the finish is everything, change to a new bit every hour and a half of run time”. You want that surface pretty- and an upcut makes that difficult if it isn’t sharp. You MUST use the upcut to clear the chips and to avoid melting/welding as “re-cutting” is almost inevitable with the downcut.